If you are reading this blog post via a 3rd party source it is very likely that many parts of it will not render correctly (usually, the interactive graphs). Please view the post on dogesec.com for the full interactive viewing experience.
tl;dr
A post full of code examples that will give you everything you need to start creating STIX objects to make it simple to share your threat research.
Overview
The STIX2 Python library from OASIS is a set of Python APIs that allow you to quickly start creating STIX 2.1 content. It is likely to be the tool you use most as a STIX 2.1 producer.
There are a wide range of functions it can be used for. This post aims to cover some of the most common that you will likely want to perform.
Preparation
To follow along with this tutorial, first clone our tutorial repository and install the cti-python-stix2 library like so.
First I’ll create a venv to isolate our work;
mkdir stix2_python_tutorial
python3 -m venv stix2_python_tutorial
source stix2_python_tutorial/bin/activate
pip3 install stix2
Lets jump in feet first and create two different STIX objects an SDO and an SCO.
Creating SDOs and SCOs
Now lets create a file called generate_sdo.py and use it to generate an Attack Pattern.
# python3 generate_sdo.py
## Start by importing all the things you will need
### https://stix2.readthedocs.io/en/latest/api/v21/stix2.v21.sdo.html#stix2.v21.sdo.AttackPattern
### https://stix2.readthedocs.io/en/latest/api/stix2.v21.html?highlight=tlp#stix2.v21.TLPMarking

from stix2 import AttackPattern, TLP_GREEN

## Create AttackPattern SDO using the files

AttackPatternDemo = AttackPattern(
    created_by_ref="identity--9779a2db-f98c-5f4b-8d08-8ee04e02dbb5",
    name="Spear Phishing",
    description="Used for tutorial content",
    object_marking_refs=[
        TLP_GREEN
    ]
)

## Print all the objects to the command line

print(AttackPatternDemo.serialize(pretty=True))
Running the script prints;
{
    "type": "attack-pattern",
    "spec_version": "2.1",
    "id": "attack-pattern--794709ca-2407-4da8-a6ec-e4b1e074a18d",
    "created_by_ref": "identity--9779a2db-f98c-5f4b-8d08-8ee04e02dbb5",
    "created": "2020-01-01T07:38:55.364693Z",
    "modified": "2020-01-01T07:38:55.364693Z",
    "name": "Spear Phishing",
    "description": "Used for tutorial content",
    "object_marking_refs": [
        "marking-definition--613f2e26-407d-48c7-9eca-b8e91df99dc9"
    ]
}
Note, how the library takes care of some of the required properties here; type, spec_version, id, created, modified.
It’s important to review the STIX specification beforehand to ensure you’re passing the right properties, and the correct data types for these properties.
For example, try again, but this time change created_by_ref=DOGESEC in the above code. You’ll see and error like the following returned;
stix2.exceptions.InvalidValueError: Invalid value for AttackPattern 'created_by_ref': not a valid STIX identifier, must match <object-type>--<UUID>: DOGESEC
You’ll also see the reference of certain functions to, for example to reference TLPs in object_marking_refs:
    object_marking_refs=[
        TLP_GREEN
    ]
The STIX2 library only supports TLPv1 as it stands.
The process to create an SCO is very similar.
I’ll start by creating a file called generate_sco.py;
# python3 generate_sco.py
## Start by importing all the things you will need
### IPv4 SCO https://stix2.readthedocs.io/en/latest/api/stix2.v21.html#stix2.v21.IPv4Address

from stix2 import IPv4Address

## Create IPv4Address SCO using the files

IPv4AddressDemo = IPv4Address(
    value="177.60.40.7"
)

## Print all the objects to the command line

print(IPv4AddressDemo.serialize(pretty=True))
Running the script prints;
{
    "type": "ipv4-addr",
    "spec_version": "2.1",
    "id": "ipv4-addr--dc63603e-e634-5357-b239-d4b562bc5445",
    "value": "177.60.40.7"
}
It is also possible to assign a TLP to an SCO using object_marking_refs (it’s an Optional Common Property), I just decided not to in my code above.
A long and important note on ID generation
The STIX specification states:
All identifiers, excluding those used in the deprecated Cyber Observable Container, MUST follow the form object-type–UUID, where object-type is the exact value (all type names are lowercase strings, by definition) from the type property of the object being identified or referenced and where the UUID MUST be an RFC 4122-compliant UUID [RFC4122].
STIX Domain Objects, STIX Relationship Objects, STIX Meta Objects, and STIX Bundle Object SHOULD use UUIDv4 for the UUID portion of the identifier. Producers using something other than UUIDv4 need to be mindful of potential collisions and should use a namespace that guarantees uniqueness, however, they MUST NOT use a namespace of 00abedb4-aa42-466c-9c01-fed23315a9b7 if generating a UUIDv5.
As such, when using the STIX 2 Python library, random UUID v4s will be generated for SDOs, SROs, SMOs, and SBOs.
This means every time I run the code generate_sdo.py, a new UUID is generated. Try it.
As SCOs represent atomic objects that don’t change, they instead use UUID v5s so the UUID persist no matter who generates or when the object was generated. Thus all IPv4 SCOs with the value 1.1.1.1 should all have the same IPv4 SCO ID.
This is useful as it means when sharing STIX data, it is clear if two producers of intel are talking about the same thing (easily identified as the IDs will be identical)
As per the STIX spec;
STIX Cyber-observable Objects SHOULD use UUIDv5 for the UUID portion of the identifier
By following the rules;
- The namespace SHOULD be
00abedb4-aa42-466c-9c01-fed23315a9b7. This defined namespace is necessary to support the goal of deduplication and semantic equivalence of some STIX objects in the community of producers. - The value of the name portion SHOULD be the list of “ID Contributing Properties” (property-name and property value pairs) as defined on each SCO object and SHOULD be represented as a JSON object that is then serialized / stringified according to [RFC8785] to ensure a canonical representation of the JSON data.
In this post, I wrote how SCOs contained ID Contributing Properties. Take the Domain SCO specification…
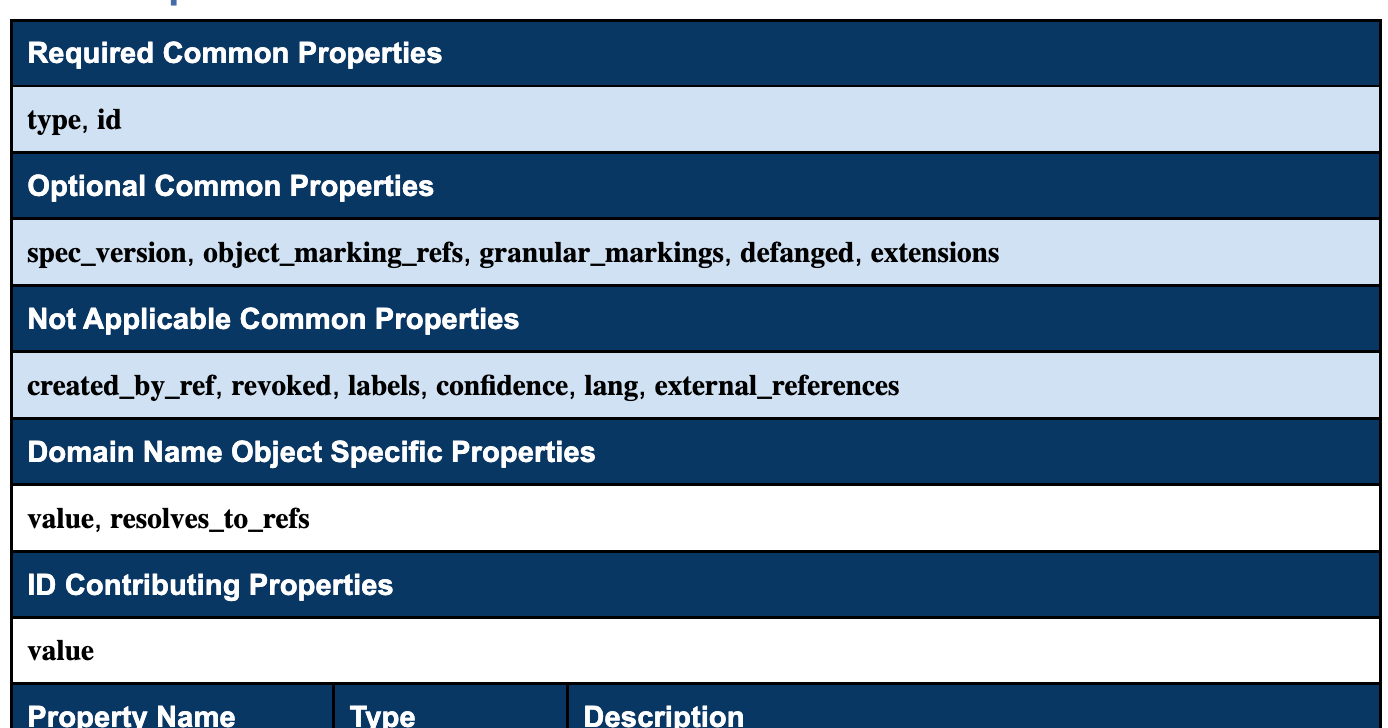
This means the the ID here will be generated using the namespace 00abedb4-aa42-466c-9c01-fed23315a9b7 and the value property of the domain object.
The good news is, the STIX 2 Python library does this for us automatically, so I don’t have to worry about generating the UUID v5s for SCOs.
# python3 sco_uuid_demo.py
## Start by importing all the things you will need
### Domain name SCO https://stix2.readthedocs.io/en/latest/api/v21/stix2.v21.observables.html#stix2.v21.observables.DomainName

from stix2 import DomainName

## Create DomainName SDO using the files

DomainNameDemo = DomainName(
    value="google.com"
)

## Print all the objects to the command line

print(DomainNameDemo.serialize(pretty=True))
Prints;
{
    "type": "domain-name",
    "spec_version": "2.1",
    "id": "domain-name--dd686e37-6889-53bd-8ae1-b1a503452613",
    "value": "google.com"
}
Running it again;
{
    "type": "domain-name",
    "spec_version": "2.1",
    "id": "domain-name--dd686e37-6889-53bd-8ae1-b1a503452613",
    "value": "google.com"
}
Lets add another property that is not an ID contributing property (that is a property that will not change the way the id UUID generation happens)
# python3 sco_uuid_contributing_prop_demo.py
## Start by importing all the things you will need
### Domain name SCO https://stix2.readthedocs.io/en/latest/api/v21/stix2.v21.observables.html#stix2.v21.observables.DomainName

from stix2 import DomainName

## Create DomainName SDO using the files

DomainNameDemo = DomainName(
    value="google.com",
    resolves_to_refs="ipv4-addr--dc63603e-e634-5357-b239-d4b562bc5445"
)

## Print all the objects to the command line

print(DomainNameDemo.serialize(pretty=True))
Prints:
{
    "type": "domain-name",
    "spec_version": "2.1",
    "id": "domain-name--dd686e37-6889-53bd-8ae1-b1a503452613",
    "value": "google.com",
    "resolves_to_refs": [
        "ipv4-addr--dc63603e-e634-5357-b239-d4b562bc5445"
    ]
}
See how the ID is still the same? That’s because only the value property is used to generate the UUIDv5. Any other properties will have no effect on the id. Note, all SCOs have different ID contributing properties, some more than one, that will change the UUIDv5 generation.
When generating SDOs, SROs, and SMOs, I occasionally use UUID v5s too (but UUID v4s are recommended by OASIS).
Using UUIDv5s means I can identify objects generated by us using the ID property alone and it also means I can control the STIX IDs to meet our needs (e.g. giving an Indicator and Vulnerability the same UUID portion of the id, when they are directly coupled).
To do this, I just explicitly pass the ID, and the ID generation logic when generating the SDO, SRO, or SMO. For example I could modify the Attack Pattern SDO example I used above to generate a UUIDv5 as follows;
# python3 generate_sdo_with_uuidv5.py
## Start by importing all the things you will need
import uuid

from uuid import UUID
from stix2 import AttackPattern, TLP_GREEN

## Set the uuid variables

namespace = UUID("d2916708-57b9-5636-8689-62f049e9f727")
value = "Some fixed value"
generated_id = "attack-pattern--" + str(uuid.uuid5(namespace, value))

## Create ThreatActor SDO using the files

AttackPatternUUID5Demo = AttackPattern(
    id=generated_id,
    created_by_ref="identity--9779a2db-f98c-5f4b-8d08-8ee04e02dbb5",
    name="Spear Phishing",
    description="Used for tutorial content",
    object_marking_refs=[
        TLP_GREEN
    ]
)

## Print all the objects to the command line

print(AttackPatternUUID5Demo.serialize(pretty=True))
Prints:
{
    "type": "attack-pattern",
    "spec_version": "2.1",
    "id": "attack-pattern--6b948b5a-3c09-5365-b48a-da95c3964cb5",
    "created_by_ref": "identity--9779a2db-f98c-5f4b-8d08-8ee04e02dbb5",
    "created": "2020-01-01T11:21:07.478851Z",
    "modified": "2020-01-01T11:21:07.478851Z",
    "name": "Spear Phishing",
    "description": "Used for tutorial content",
    "object_marking_refs": [
        "marking-definition--34098fce-860f-48ae-8e50-ebd3cc5e41da"
    ]
}
Notice how each time the script is run, the ID of the Attack Pattern object generated is always the same (attack-pattern--6b948b5a-3c09-5365-b48a-da95c3964cb5).
Another long and important note this time on versioning
(Which is closely related to ID generation).
STIX 2.1 Versioning allows for the tracking and management of such changes.
SDOs, SROs, and Language Content SMOs
STIX SDOs, SROs, and Language Content SMOs can be versioned in order to update, add, remove information, or revoke the entire Object.
The decision ultimately comes down to whether to use the same Object (minor change), a new Object (major change), or to revoke the Object from circulation entirely when creating a new version of it.
First it is important to realise every STIX SDOs, SROs, and Language Content SMO has three required Common Properties important for versioning;
idcreatedmodified
In the STIX specification OASIS mention minor or major changes. In short, a minor change means the object keeps the same id, but the other properties are modified. A major changes creates an entirely new object.
However, the specification does not definitively define exactly what constitutes a minor or major change. Let me give you our take on it…
Generally minor changes are what I use. Intelligence evolves over time. New things are learned. This doesn’t usually require a new object. For example, I might want to update the description, or add a new property to reflect what I’ve learned.
In this case I just modify the object with these changes making sure the id and created values do not change, and the modified property reflects the time of the update.
As noted earlier using UUIDv5s to control IDs of SDOs, SROs, and SMOs is not required (and not recommended). The STIX2 library offers a range of versioning methods which are usedful for updating these objects to ensure UUIDs persist.
For example, lets uss the original Attack Pattern object I generated;
{
    "type": "attack-pattern",
    "spec_version": "2.1",
    "id": "attack-pattern--794709ca-2407-4da8-a6ec-e4b1e074a18d",
    "created_by_ref": "identity--9779a2db-f98c-5f4b-8d08-8ee04e02dbb5",
    "created": "2020-01-01T07:38:55.364693Z",
    "modified": "2020-01-01T07:38:55.364693Z",
    "name": "Spear Phishing",
    "description": "Used for tutorial content",
    "object_marking_refs": [
        "marking-definition--613f2e26-407d-48c7-9eca-b8e91df99dc9"
    ]
}
To update this, and ensure the UUID persists, I can use the new_version function in the STIX 2 library as follows;
# python3 update_sdo.py
## Start by importing all the things you will need
### https://stix2.readthedocs.io/en/latest/api/v21/stix2.v21.sdo.html#stix2.v21.sdo.AttackPattern
### https://stix2.readthedocs.io/en/latest/api/stix2.v21.html?highlight=tlp#stix2.v21.TLPMarking

from stix2 import AttackPattern, TLP_GREEN, new_version

## Create Attack Pattern SDO using the files

AttackPatternDemo = AttackPattern(
    created_by_ref="identity--9779a2db-f98c-5f4b-8d08-8ee04e02dbb5",
    name="Spear Phishing",
    description="Used for tutorial content",
    object_marking_refs=[
        TLP_GREEN
    ]
)

## Print all the objects to the command line

print(AttackPatternDemo.serialize(pretty=True))

## Update the Attack Pattern SDO

UpdatedAttackPatternDemo = new_version(
    AttackPatternDemo,
    description="new description")

## Print all the objects to the command line

print(UpdatedAttackPatternDemo.serialize(pretty=True))
Prints:
{
    "type": "attack-pattern",
    "spec_version": "2.1",
    "id": "attack-pattern--f6455edf-222b-48c3-8604-d672929cd40e",
    "created_by_ref": "identity--9779a2db-f98c-5f4b-8d08-8ee04e02dbb5",
    "created": "2020-01-01T08:28:30.688249Z",
    "modified": "2020-01-01T08:28:30.688249Z",
    "name": "Spear Phishing",
    "description": "Used for tutorial content",
    "object_marking_refs": [
        "marking-definition--34098fce-860f-48ae-8e50-ebd3cc5e41da"
    ]
}
{
    "type": "attack-pattern",
    "spec_version": "2.1",
    "id": "attack-pattern--f6455edf-222b-48c3-8604-d672929cd40e",
    "created_by_ref": "identity--9779a2db-f98c-5f4b-8d08-8ee04e02dbb5",
    "created": "2020-01-01T08:28:30.688249Z",
    "modified": "2020-02-01T07:38:55.364693Z",
    "name": "Spear Phishing",
    "description": "new description",
    "object_marking_refs": [
        "marking-definition--34098fce-860f-48ae-8e50-ebd3cc5e41da"
    ]
}
As you can see the id and created properties persist, but notice how the modified time changes.
One common scenario where a new Object must be created, thus denoting a major change, is when someone other than the creator (defined in the created_by_ref Property) wants to make a change to an Object.
Other scenarios where a major change might be considered, is when a serious factual error was made to the original object.
Instead of updating the Object like in a minor change, the process of performing a major change involves creating a new Object as I’ve shown in this post.
However, it’s also a good idea to;
- revoke the first object, if applicable
- link the objects together using a Relationship SRO so that there is a history of what has happened
On the subject of revoking an object, that’s easy. SDOs, SROs, and Language Content SMOs have an optional common property revoked. By setting the to true, will mark that the object is no longer active and should not be considered.
On the second point, creating a Relationship object, I’ll come back to that in a bit.
What about versioning SCOs and Marking Definition SMOs?
SCOs and Marking Definition SMOs never contain the modified property.
However, there are of course many occasions where SCOs do need to be updated.
Generally an SCOs ID will not change on modification, unless you modify an ID contributing property. For most objects, this is the value property. If you are changing the ID contributing property of an object it will thus always constitute a major update. Note, the revoked property does not exist for SCOs, but you likely want to handle major updates to SCOs in the same way as for SDOs, et al.
When it comes to minor updates, things are slightly different as there is no modified property to show which one is the latest version (and the id should always persist).
Thus I use the same approach as major updates to update SCOs, using a SRO to link them with with the Property "relationship_type": "update-of".
Speaking of relationship objects…
Creating Relationship SROs
Continuing the example of a major update…
Lets imagine I have two SDOs;
malware--2f559518-c844-4c4e-bca3-cc97520c164a: original version of the object but it contains many serious errorsmalware--09d22009-b575-4880-889f-6c539157dbc7: the new version of the object (denoting the same Malware) with errors corrected.
Here I want to create a Relationship SRO to link these objects and describe the link between them (replace-by). To create a relationship SRO;
# python3 generate_sro.py
## Start by importing all the things you will need
### IPv4 SCO https://stix2.readthedocs.io/en/latest/api/v21/stix2.v21.sro.html#stix2.v21.sro.Relationship
from stix2 import Relationship

## Create Relationship SRO using the files

RelationshipDemo = Relationship(
    created_by_ref="identity--9779a2db-f98c-5f4b-8d08-8ee04e02dbb5",
    relationship_type="replaced-by",
    source_ref="malware--2f559518-c844-4c4e-bca3-cc97520c164a",
    target_ref="malware--09d22009-b575-4880-889f-6c539157dbc7"
)

## Print all the objects to the command line

print(RelationshipDemo.serialize(pretty=True))
{
    "type": "relationship",
    "spec_version": "2.1",
    "id": "relationship--44ceafde-0027-45cc-bab9-b46c5e001ceb",
    "created_by_ref": "identity--9779a2db-f98c-5f4b-8d08-8ee04e02dbb5",
    "created": "2020-01-01T15:25:53.686507Z",
    "modified": "2020-01-01T15:25:53.686507Z",
    "relationship_type": "replaced-by",
    "source_ref": "malware--2f559518-c844-4c4e-bca3-cc97520c164a",
    "target_ref": "malware--09d22009-b575-4880-889f-6c539157dbc7"
}
Saving Objects to the FileSystemStore
In the last two examples I printed the Objects to the command line. Though it typically makes more sense to save them for reuse later than create them all in one go. For this I can use the STIX2 FileSystemStore API.
Lets now create an Identity SDO and store it to the filesystem;
# python3 generate_identity_sdo_store_fs.py
## Start by importing all the things you will need
### https://stix2.readthedocs.io/en/latest/api/v21/stix2.v21.sdo.html#stix2.v21.sdo.Identity
### https://stix2.readthedocs.io/en/latest/api/stix2.datastore.html
from stix2 import Identity
from stix2 import FileSystemStore

## Create Identity SDO using the files

IdentityDemo = Identity(
    identity_class="organization",
    name="Example Corp.",
    type="identity"
)

## Write the to directory path tmp/stix2_store

fs = FileSystemStore("tmp/stix2_store")
fs.add([IdentityDemo])
python3 generate_identity_sdo_store_fs.py
After running the script you’ll now find the object stored in the location defined, in my case tmp/stix2_store;
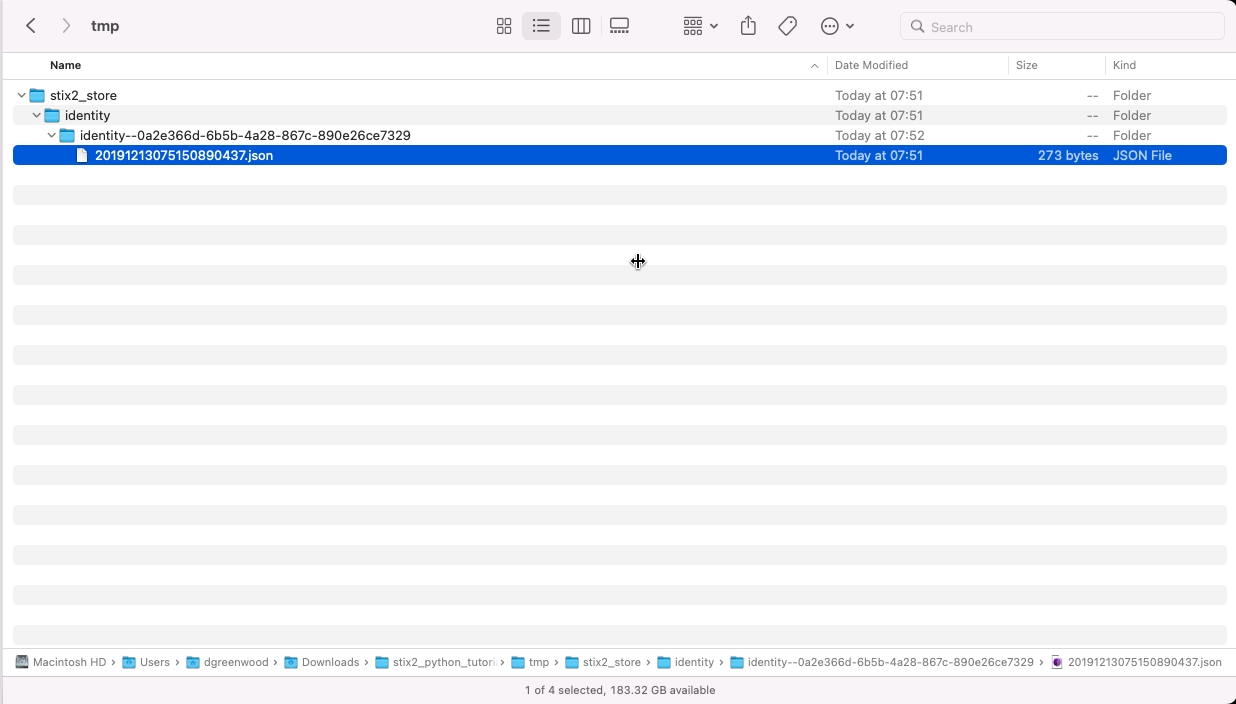
For objects that contain a modified property, like an SRO, you will see the objects stored in the following directory structure:
FILESYSTEM_DEFINED/
├── OBJECT_TYPE/
│   ├── OBJECT_ID
│   │   ├── MODIFIED_DATE_OF_OBJECT.json
│   │   └── MODIFIED_DATE_OF_OBJECT.json
│   └── OBJECT_ID
│       ├── MODIFIED_DATE_OF_OBJECT.json
│       └── MODIFIED_DATE_OF_OBJECT.json
└── OBJECT_TYPE/
    └── OBJECT_ID
        ├── MODIFIED_DATE_OF_OBJECT.json
        └── MODIFIED_DATE_OF_OBJECT.json
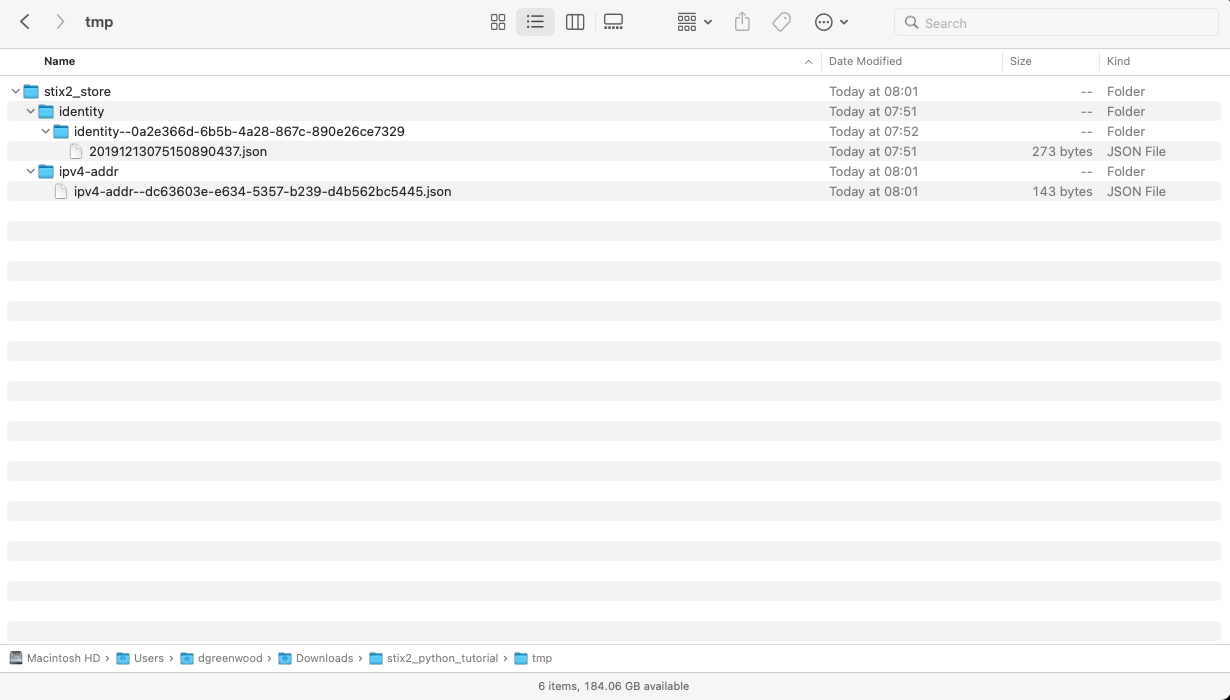
Those that do not contain a modified time, namely SCOs, will be stored as follows;
FILESYSTEM_DEFINED/
├── OBJECT_TYPE/
│   ├── OBJECT_ID
│   └── OBJECT_ID
└── OBJECT_TYPE/
    ├── OBJECT_ID
    └── OBJECT_ID
Again, to demonstrate;
# python3 generate_sco_in_fs.py
## Start by importing all the things you will need
### IPv4 SCO https://stix2.readthedocs.io/en/latest/api/stix2.v21.html#stix2.v21.IPv4Address
from stix2 import IPv4Address
from stix2 import FileSystemStore

## Create IPv4Address SCO using the files

IPv4AddressDemo = IPv4Address(
    value="177.60.40.7"
)

## Print all the objects to the command line

fs = FileSystemStore("tmp/stix2_store")
fs.add([IPv4AddressDemo])
Calling objects from the filesystem
In many cases you’ll want to call existing objects from the filesystem to be used.
Lets write some more objects to the filesystem.
# python3 store_objects_to_fs_for_recall.py
## Start by importing all the things you will need
from stix2 import AttackPattern, ThreatActor, TLP_GREEN
from stix2 import FileSystemStore

## Create ThreatActor SDO using the files

AttackPatternFSDemo = AttackPattern(
    id="attack-pattern--b2c77df1-7aac-4b02-bdf1-6e71cb023d61",
    created_by_ref="identity--9779a2db-f98c-5f4b-8d08-8ee04e02dbb5",
    name="Spear Phishing",
    object_marking_refs=[
        TLP_GREEN
    ]
)

ThreatActorFSDemo = ThreatActor(
    id="threat-actor--db09d012-6be1-4c08-bd0e-15f6910f1758",
    created_by_ref="identity--9779a2db-f98c-5f4b-8d08-8ee04e02dbb5",
    name="A bad guy",
    threat_actor_types="sensationalist",
    object_marking_refs=[
        TLP_GREEN
    ]
)

## Write the to directory path tmp/stix2_store

fs = FileSystemStore("tmp/stix2_store")
fs.add([AttackPatternFSDemo,ThreatActorFSDemo])
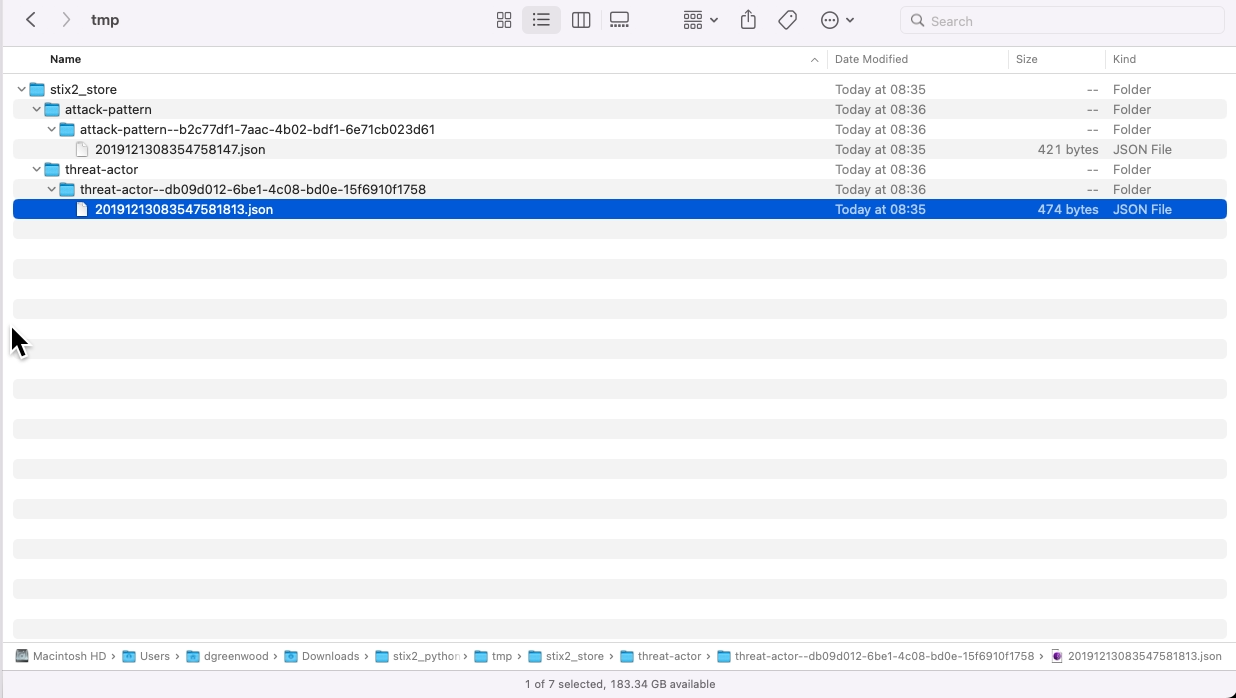
Now these are stored, I can call them at anytime from the filesystem as follows;
# python3 recall_objects_for_sro.py
from stix2 import AttackPattern, ThreatActor, TLP_GREEN, Relationship
from stix2 import FileSystemStore

## Get required Objects previously saved to filesystem source
### https://stix2.readthedocs.io/en/latest/guide/filesystem.html#FileSystemSource

fs = FileSystemStore("tmp/stix2_store")

## Load them

AttackPatternInFS = fs.get("attack-pattern--b2c77df1-7aac-4b02-bdf1-6e71cb023d61")
ThreatActorInFS = fs.get("threat-actor--db09d012-6be1-4c08-bd0e-15f6910f1758")

RelationshipDemoUsingFS = Relationship(
    id="relationship--4a58e575-8ace-49b3-9137-26c76aaa25b8",
    created_by_ref="identity--9779a2db-f98c-5f4b-8d08-8ee04e02dbb5",
    relationship_type="uses",
    source_ref=ThreatActorInFS,
    target_ref=AttackPatternInFS
)

## Write the to directory path tmp/stix2_store

fs.add([RelationshipDemoUsingFS])
And voila, I now have an SRO connecting them…
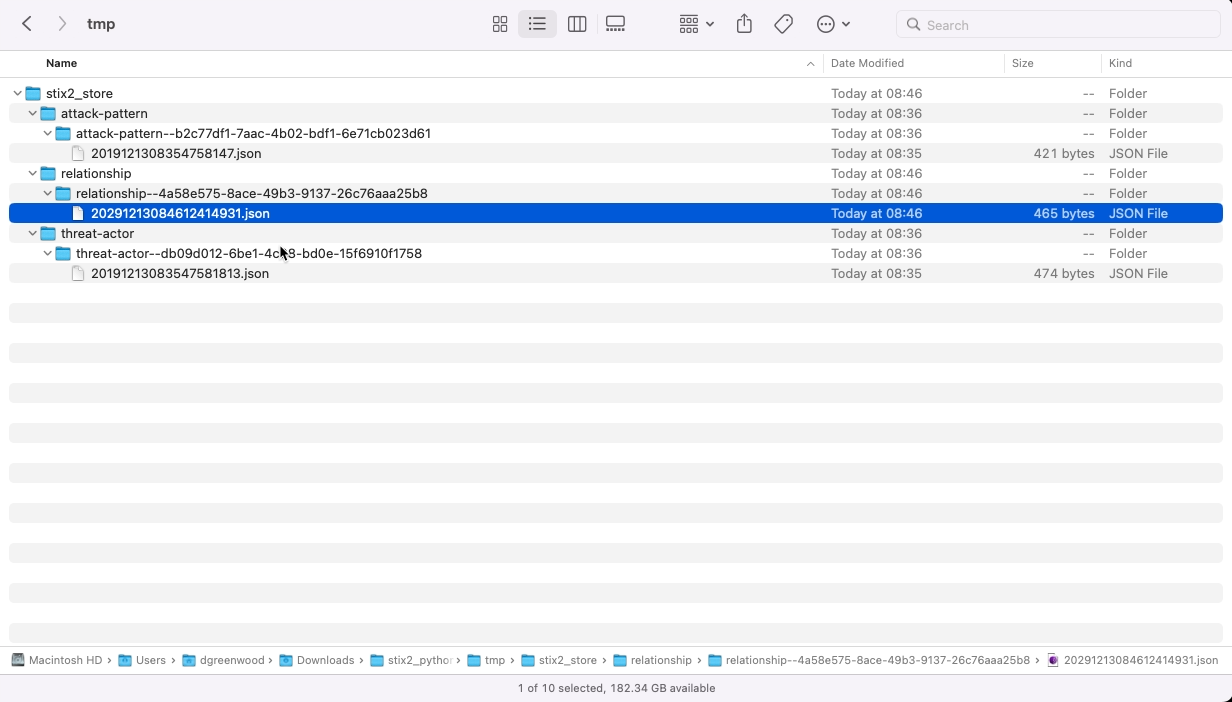
Though this assumes I know the objects I want by id using the get method, which clearly is not always the case…
Searching the filesystem
You can search the filesystem using a query;
# python3 query_filesystem.py
## https://stix2.readthedocs.io/en/latest/api/stix2.datastore.html#stix2.datastore.CompositeDataSource.query
## https://stix2.readthedocs.io/en/latest/api/datastore/stix2.datastore.filters.html?highlight=Filter

from stix2 import FileSystemStore, Filter

fs = FileSystemStore("tmp/stix2_store")

# Create a filter for the query
filter1 = Filter('name', '=', 'Spear Phishing')

# Perform the query using the filter
SpearPhishingSearch = fs.query([filter1])

# Print the results
for item in SpearPhishingSearch:
    print(item)
Running this, will return all items in the filesystem where the name property is Spear Phishing;
{"type": "attack-pattern", "spec_version": "2.1", "id": "attack-pattern--b2c77df1-7aac-4b02-bdf1-6e71cb023d61", "created_by_ref": "identity--9779a2db-f98c-5f4b-8d08-8ee04e02dbb5", "created": "2023-12-13T08:35:47.58147Z", "modified": "2023-12-13T08:35:47.58147Z", "name": "Spear Phishing", "object_marking_refs": ["marking-definition--34098fce-860f-48ae-8e50-ebd3cc5e41da"]}
Another useful way to search is to retrieve STIX Objects that have a Relationship involving the given STIX object. This can be done using related_to;
# python3 query_filesystem_related.py
## https://stix2.readthedocs.io/en/latest/api/stix2.datastore.html#stix2.datastore.CompositeDataSource.related_to
## https://stix2.readthedocs.io/en/latest/api/datastore/stix2.datastore.filters.html?highlight=Filter

from stix2 import FileSystemStore

fs = FileSystemStore("tmp/stix2_store")

# Perform the query using the filter
RelatedToSpearPhishing = fs.related_to("attack-pattern--b2c77df1-7aac-4b02-bdf1-6e71cb023d61")

# Print the results
for item in RelatedToSpearPhishing:
    print(item)
{"type": "threat-actor", "spec_version": "2.1", "id": "threat-actor--db09d012-6be1-4c08-bd0e-15f6910f1758", "created_by_ref": "identity--9779a2db-f98c-5f4b-8d08-8ee04e02dbb5", "created": "2023-12-13T08:35:47.581813Z", "modified": "2023-12-13T08:35:47.581813Z", "name": "A bad guy", "threat_actor_types": ["sensationalist"], "object_marking_refs": ["marking-definition--34098fce-860f-48ae-8e50-ebd3cc5e41da"]}
I can see the Threat Actor that is related to our Attack Pattern object (attack-pattern--b2c77df1-7aac-4b02-bdf1-6e71cb023d61).
Bundling everything together
If you remember back to last weeks post, to share STIX objects, usually they are bundled together.
Lets bundle the objects previously stored in the filestore;
# python3 bundle_filesystem_objects.py
## https://stix2.readthedocs.io/en/latest/guide/filesystem.html#FileSystemSource
## https://stix2.readthedocs.io/en/latest/api/v21/stix2.v21.bundle.html#stix2.v21.bundle.Bundle

from stix2 import Bundle
from stix2 import FileSystemStore

fs = FileSystemStore("tmp/stix2_store")

## Get all Objects previously saved to filesystem source

AttackPatternInFS = fs.get("attack-pattern--b2c77df1-7aac-4b02-bdf1-6e71cb023d61")
ThreatActorInFS = fs.get("threat-actor--db09d012-6be1-4c08-bd0e-15f6910f1758")
RelationshipInFS = fs.get("relationship--4a58e575-8ace-49b3-9137-26c76aaa25b8")

BundleofAllObjects = Bundle(AttackPatternInFS,ThreatActorInFS,RelationshipInFS)

## Print the bundle

print(BundleofAllObjects.serialize(pretty=True))
{
    "type": "bundle",
    "id": "bundle--ed31bd4b-46ab-4965-8796-12b4d5ad9fcc",
    "objects": [
        {
            "type": "attack-pattern",
            "spec_version": "2.1",
            "id": "attack-pattern--b2c77df1-7aac-4b02-bdf1-6e71cb023d61",
            "created_by_ref": "identity--9779a2db-f98c-5f4b-8d08-8ee04e02dbb5",
            "created": "2020-01-01T08:28:30.688249Z",
            "modified": "2020-01-01T08:28:30.688249Z",
            "name": "Spear Phishing",
            "object_marking_refs": [
                "marking-definition--34098fce-860f-48ae-8e50-ebd3cc5e41da"
            ]
        },
        {
            "type": "threat-actor",
            "spec_version": "2.1",
            "id": "threat-actor--db09d012-6be1-4c08-bd0e-15f6910f1758",
            "created_by_ref": "identity--9779a2db-f98c-5f4b-8d08-8ee04e02dbb5",
            "created": "2020-01-01T08:28:30.688249Z",
            "modified": "2020-01-01T08:28:30.688249Z",
            "name": "A bad guy",
            "threat_actor_types": [
                "sensationalist"
            ],
            "object_marking_refs": [
                "marking-definition--34098fce-860f-48ae-8e50-ebd3cc5e41da"
            ]
        },
        {
            "type": "relationship",
            "spec_version": "2.1",
            "id": "relationship--4a58e575-8ace-49b3-9137-26c76aaa25b8",
            "created_by_ref": "identity--9779a2db-f98c-5f4b-8d08-8ee04e02dbb5",
            "created": "2020-01-01T08:28:30.688249Z",
            "modified": "2020-01-01T08:28:30.688249Z",
            "relationship_type": "uses",
            "source_ref": "threat-actor--db09d012-6be1-4c08-bd0e-15f6910f1758",
            "target_ref": "attack-pattern--b2c77df1-7aac-4b02-bdf1-6e71cb023d61"
        }
    ]
}
Note, you can’t add a bundle directly to the filestore, so should you want to do this, you’ll need to use a bit of code similar to the following;
# python3 bundle_filesystem_objects_to_fs.py
## https://stix2.readthedocs.io/en/latest/guide/filesystem.html#FileSystemSource
## https://stix2.readthedocs.io/en/latest/api/v21/stix2.v21.bundle.html#stix2.v21.bundle.Bundle

from stix2 import Bundle
from stix2 import FileSystemStore
from stix2.base import STIXJSONEncoder
import json

fs = FileSystemStore("tmp/stix2_store")

## Get all Objects previously saved to filesystem source

AttackPatternInFS = fs.get("attack-pattern--b2c77df1-7aac-4b02-bdf1-6e71cb023d61")
ThreatActorInFS = fs.get("threat-actor--db09d012-6be1-4c08-bd0e-15f6910f1758")
RelationshipInFS = fs.get("relationship--4a58e575-8ace-49b3-9137-26c76aaa25b8")

BundleofAllObjects = Bundle(
    id="bundle--1534220d-dc40-465b-a9e2-1bb7af2f8a55",
    objects=[AttackPatternInFS,ThreatActorInFS,RelationshipInFS]
)

## Save a bundle .json (cannot directly write to FS)

with open(BundleofAllObjects.id+'.json', 'w') as f:
    f.write(json.dumps(BundleofAllObjects,cls=STIXJSONEncoder))
We use the STIX2 Python library (a lot!)
Most of the code on our Github uses stix2 library to work with STIX objects. Take a look, perhaps reviewing the code will help you with more advanced uses of the library.
txt2stix is a good starting point – it extracts intelligence from text files and converts the extracted data into STIX objects.
Obstracts
The RSS reader for threat intelligence teams. Turn any blog into machine readable STIX 2.1 data ready for use with your security stack.
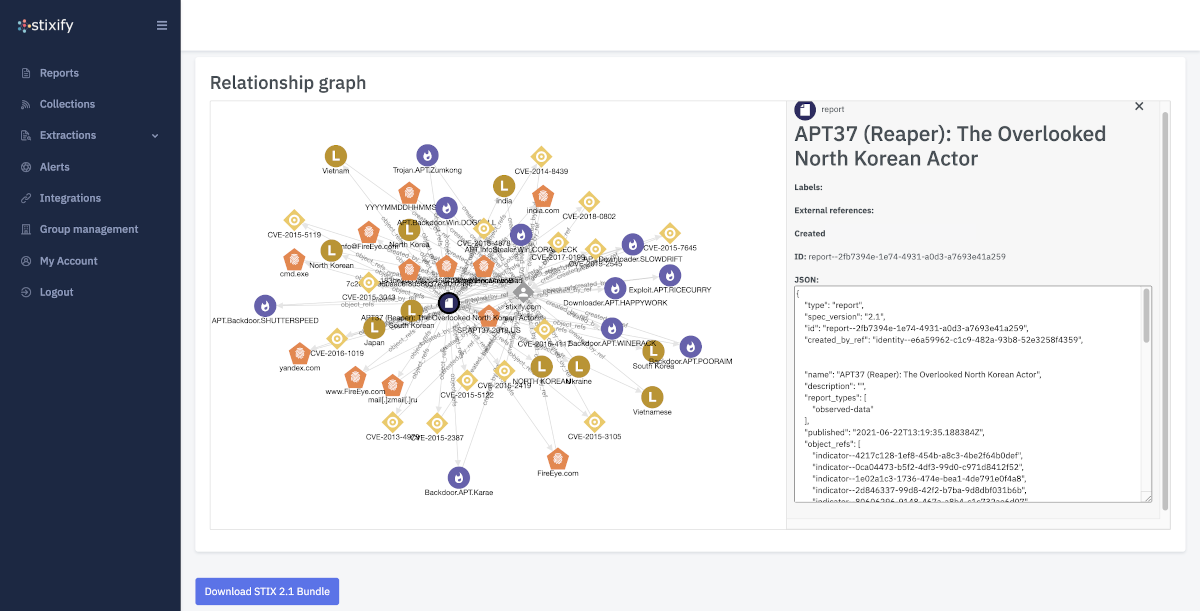
Stixify
Your automated threat intelligence analyst. Extract machine readable STIX 2.1 data ready for use with your security stack.
Discuss this post
Head on over to the dogesec community to discuss this post.
Never miss an update
Sign up to receive new articles in your inbox as they published.
